AVCLabs ai

How to Upscale An Old Movie to 4K and Reduce Noise Using AI?

Classic movies often survive only as low-resolution digital copies — soft detail, heavy film grain, and compression noise that look poor on a modern 4K TV. We ran a hands-on test to see whether AI video upscaling could improve a real archival clip without making it look over-processed.

Using AVCLabs Video Enhancer AI, we took a 22-second office scene from the classic screwball comedy His Girl Friday (1940) — Cary Grant and Rosalind Russell in a dim editorial-office two-shot — upscaled it from 640×480 to 4K with the Ultra model, and logged every model comparison, preview check, and export setting below. Total hands-on time for this sample: about 15 minutes including two different settings previews and one full GPU export (~10 minutes).

Original low resolution frame
4K AI output — sharp pinstripes, clean fedora edges, grain-free office shadows

Before

After · 4K

Case Study Brief

Why We Chose This Clip — and How We Judged Success

Before exporting anything, we defined what “good” old movie restoration should look like on this footage: less grain, sharper faces, stable edges in motion, and no plastic skin texture. We then ran two quick model previews on the same office frame before committing to a full 4K render.

Test Footage His Girl Friday (1940)

640×480 · 25fps · ~22 sec · ~4.4 MB

Download original clip
Output Goal 4K UHD Export

3840×2160 · H.264 MP4

AI Stack Ultra

Face Enhancement enabled

Processing 100% Local

GPU · No cloud upload

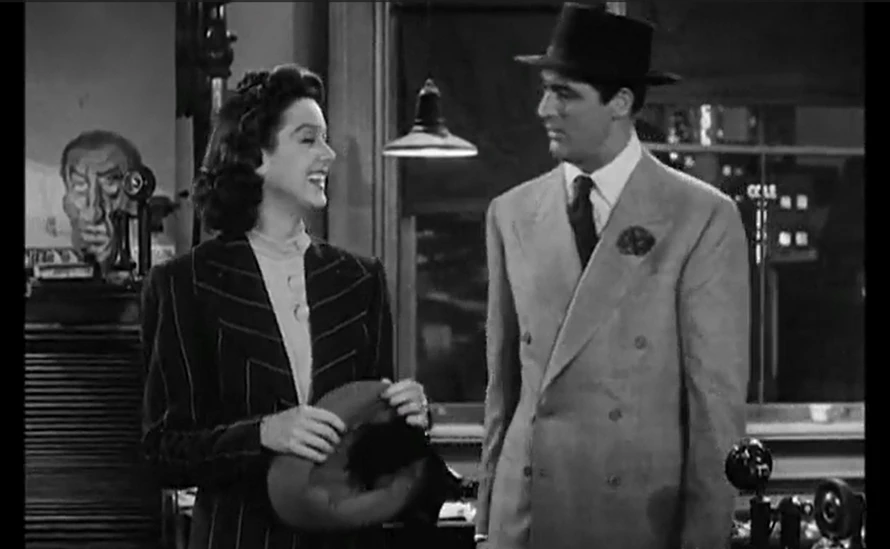
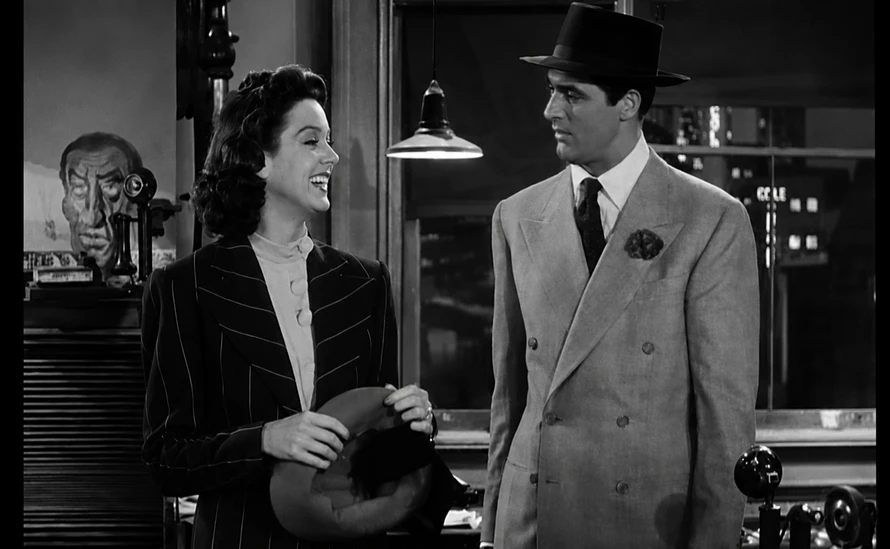
What made this clip a hard test

Scene selection
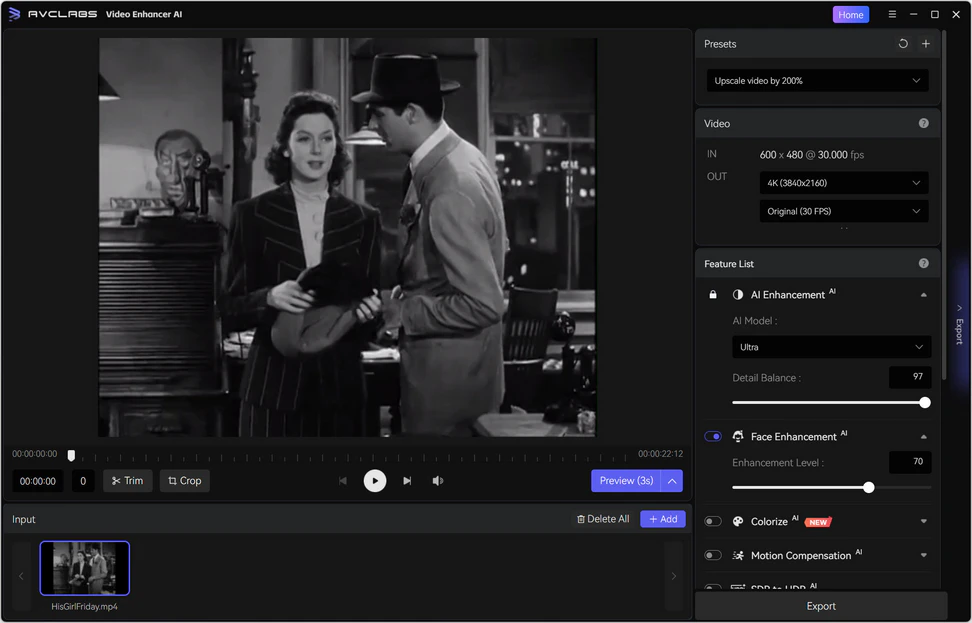
22 seconds — Walter and Hildy in a dim office two-shot, pendant lamp and night window, B&W grain throughout
Hardest frame
Hildy smiling in profile, hat in hand — bright cheek against a dark desk and candlestick telephone; the frame we used for every model comparison
Source condition
640 × 480 MP4 (H.264), ~4.4 MB, ~1.6 Mbps — a typical web rip, with visible grain and soft edges in shadows
Why not start at 720p?
We spot-checked a 720p copy of the same scene; it looked cleaner, but 640×480 matches the low-res files many users actually download
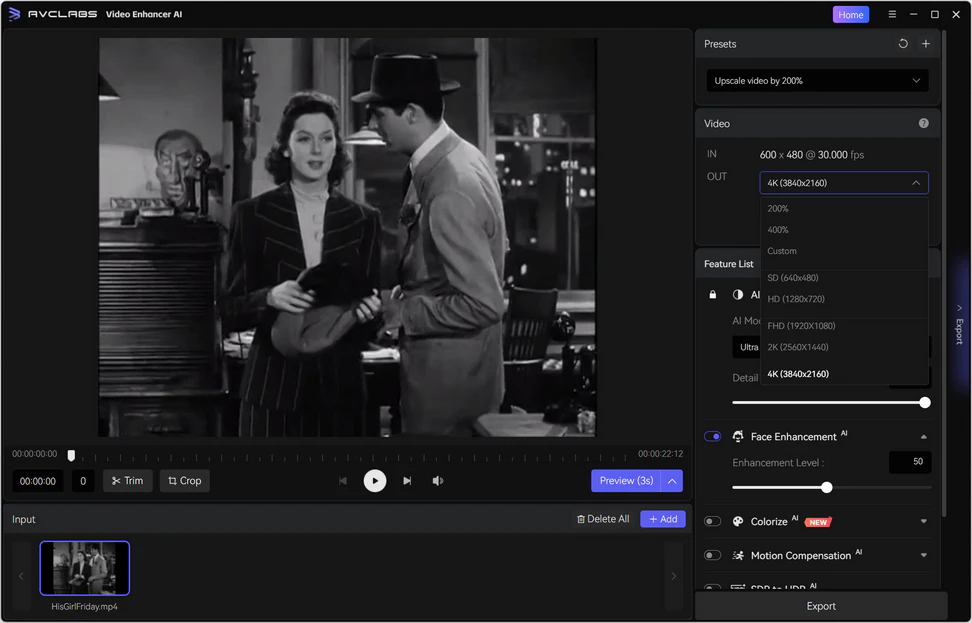
Models compared
Standard (preview) · Denoise (preview) · Ultra (final export) — Ultra won on faces, suits, and desk detail together
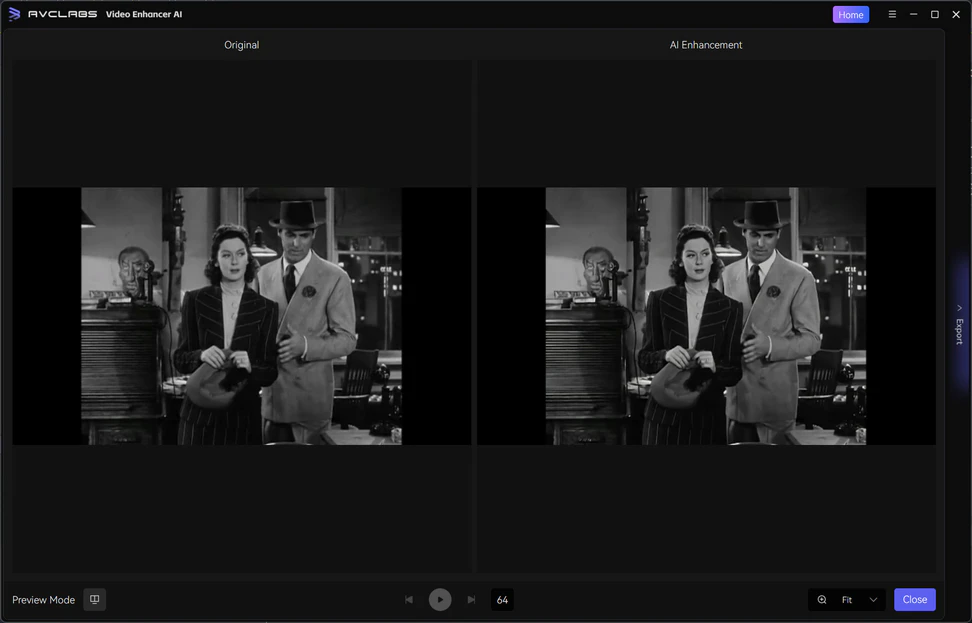
Success criteria
Clean shadows, sharp pinstripes and hat edges, readable faces under the lamp — still feels like film, not a filter
Failure signs
Waxy skin, halos on edges, flickering detail, or textures that look painted on

Test environment & export plan

Software
AVCLabs Video Enhancer AI v5.3.0 on Windows 11
Hardware
Intel Core i5-14400F · 16 GB RAM · discrete GPU · 64-bit Windows 11
Workflow order
Import & trim → compare models in preview → Ultra + Face Enhancement → 4K export → review on TV
Review setup
27-inch 4K monitor in-app preview, then VLC on a 65-inch 4K TV — laptop preview alone looked better than it played at full size
Render time
~10 min GPU export for 22 seconds (~89 MB H.264); ~25 min total including two preview passes
Privacy
All AI processing ran locally — useful when working with personal family films or unreleased archives
Workflow

How to Upscale an Old Movie to 4K — Step by Step

These are the exact steps we followed in AVCLabs Video Enhancer AI v5.3.0 on Windows 11 — including the Standard and Denoise previews we rejected before the final Ultra export. The goal was a reproducible 480p-to-4K pipeline for archival footage like this His Girl Friday rip.

01

Import and Trim to a Representative Scene

We dragged the source MP4 into AVCLabs Video Enhancer AI — no transcoding step required. For old movie restoration, picking the right scene matters more than processing the entire file on the first run.

Step 1: Import an old movie clip into AVCLabs Video Enhancer AI
02

Choose the Ultra AI Model

For low-res classic film that needs a full quality lift — upscaling, sharper detail, and noise reduction together — we selected Ultra instead of Standard. Ultra is AVCLabs’ most comprehensive model for AI video upscaling when the input is far below 720p. If a clip is otherwise fine and only heavy grain is the problem, choose the Denoise model instead. This office scene needed upscaling plus enhancement, not grain cleanup alone, so Ultra was the right pick.

Step 2: Select Ultra AI model for old movie upscaling
03

Set Output Resolution to 4K (3840×2160)

From the output menu we chose 4K (3840 × 2160). Upscale old movie clips like this only when you plan to watch on a large display — the file size jump is significant.

Step 3: Set 4K output resolution for AI video upscaling
04

Preview Before the Full Export

The built-in preview let us validate old movie upscaling settings on still frames and short loops — essential before committing GPU time to a long film.

Step 4: Preview AI upscaling results before export
05

Export, Then Review on a 4K Display

We exported to MP4 (H.264) with GPU acceleration enabled, then reviewed the file in a 4K monitor and a standard media player — not just inside the app preview.

Motion Review

Old Movie 480p vs AI-Enhanced 4K — Side-by-Side Playback

We played both clips back-to-back on a 65-inch 4K TV at seated distance — the same viewing distance we used to judge whether the upscale was worth the file size jump.

Before · 640×480 source

Original archival sample

The unenhanced clip keeps classic B&W texture, but both faces soften in the dim office light, the pinstripe on Hildy’s blazer turns to gray mush, and shadows around the pendant lamp shimmer with grain. At TV size it reads like a low-bitrate stream, not a restored print.

After · AI upscaled 4K

4K AI-enhanced sample

The 4K export restores the Walter–Hildy office beat: sharp pinstripes and fedora edges, bright readable faces under the pendant lamp, and deep shadows without grain shimmer. The night window stays softly out of focus behind them — as in the original framing — while the foreground finally looks like a proper 4K rewatch.

What We Observed While Watching

Aspect Before · Original After · 4K AI
Video Denoising Heavy grain in dim office shadows; areas around the lamp and window shimmer with noise. Shadows around the lamp and desk are nearly grain-free. Pinstripe blazer and suit fabric keep texture without looking plastic.
AI Video Upscaling Desk, telephone, and window lines feel soft; edges lack definition in motion. Hat brims, suit lapels, desk details, and the lamp cone read with clean edges — no heavy halos in pause-frame checks.
Face Detail in Motion Both faces blur slightly during movement; expression lines flicker between frames. Eyes, lips, and expression lines on both actors stay sharp and consistent. Face Enhancement smooths skin slightly — natural at TV distance, visible only up close.
Overall Verdict Reads as low-quality on a large 4K screen — authentic texture, but not watchable at full size. Reads like a cleaned-up classic clip on a large 4K screen — strong enough for home viewing and demos, though not a studio remaster.

Want to see longer before/after walkthroughs? The AVCLabs YouTube channel publishes practical tutorials on video denoising, 4K upscaling, and old footage enhancement using the same toolset tested here.

Watch Video Guides
Settings Sheet

Final Settings Used in This Old Movie 4K Test

Copy these parameters to reproduce our results on a similar 640×480 archival MP4. Total test time: ~15 minutes (previews + one full export).

Parameter Value Notes
Source File 640×480 · 25fps · H.264 · ~4.4 MB 22-second trim from a longer His Girl Friday rip; ~1.6 Mbps — typical of low-quality archival downloads.
AI Model Ultra (final) Beat Standard on fedora brim and pinstripe blazer detail; beat Denoise preview on upscaling strength. Ultra handles denoising and enhancement in one pass.
Models previewed Standard · Denoise · Ultra Standard = too soft on clothing edges. Denoise = clean shadows but weak 4K detail. Ultra = best balance for this clip.
Denoise model Not used in this test Pick Denoise when grain is the only major flaw and the rest of the clip is already acceptable. Ultra already denoises while upscaling — the better fit for this 640×480 → 4K test.
Face Enhancement ON Improved both faces under the pendant lamp; skin reads clean on TV, with slight smoothing up close.
Output Resolution 4K (3840×2160) Target: large-screen playback. Expect ~89 MB for a 22-second sample at these settings.
Frame Rate 25fps (preserved) No frame interpolation — keeps original film timing.
Color / Tone Default We skipped aggressive grading; heavy correction can look unnatural on faded black-and-white scans.
Output Format MP4 (H.264) · ~89 MB GPU accelerated · ~32 Mbps effective · reviewed in VLC on a 65-inch 4K TV
Processing Mode GPU accelerated · local only ~10 min for 22 seconds on Intel Core i5-14400F · 16 GB RAM; ~25 min total with previews
FAQ

Common Questions About Upscaling Old Movies to 4K

Answers based on this case study and typical AVCLabs Video Enhancer AI workflows for archival footage.

Does AI really upscale old movies to 4K?

Yes — AI video upscaling can convert a low-resolution old movie clip into a 4K file and improve perceived sharpness. In our His Girl Friday test, a 640×480 / ~1.6 Mbps rip became a ~89 MB 4K export with Ultra in about 10 minutes. Use Ultra when you want upscaling plus overall enhancement; use the Denoise model only when grain is the sole problem and the rest of the clip is already acceptable.

What PC do I need for old movie 4K upscaling?

For comfortable 4K work we recommend 16 GB RAM, a discrete GPU such as NVIDIA GTX 1660 or better (our test used an Intel Core i5-14400F with 16 GB RAM), and plenty of free disk space — a 4K export can be many times larger than the source. CPU-only processing works but is much slower; GPU acceleration cut our 22-second sample render to about 10 minutes.

How long does a full old movie take to upscale to 4K?

Scale from our sample: 22 seconds took ~10 minutes with Ultra on an Intel Core i5-14400F with 16 GB RAM and GPU acceleration (~25 minutes including Standard and Denoise previews). A 2-hour film at similar settings could take many hours — often 4–8+ depending on GPU, resolution jump, and enhancement options. Batch overnight processing is the practical approach for full features.

Which settings work best for old black-and-white movies?

Match the model to the problem. Use Ultra for low-res sources that need upscaling plus overall enhancement — it improves detail and reduces noise in one pass. Choose the Denoise model when the clip is otherwise acceptable and heavy grain is the main issue. Turn on Face Enhancement for dialogue scenes like this one. For grayscale footage that needs color, AVCLabs also offers a Colorize model. Always preview dark and bright frames first.

Does AVCLabs upload my videos to the cloud?

No. AVCLabs Video Enhancer AI runs entirely on your computer. That matters for private family films, unreleased archives, and large files that would be impractical to upload. All AI models in this case study executed locally on the GPU.

Will AI upscaling make old footage look fake or over-sharpened?

It can, if settings are too aggressive. In this test, hat and suit edges stayed crisp without obvious halos. Face Enhancement did smooth skin slightly — fine at normal TV distance, visible only if you zoom in. Preview motion frames before a full export, and use Detail Balance if edges look too sharp.

Run Your Own Test

Upscale Your Old Movies to 4K — Start With a Short Clip

Download AVCLabs Video Enhancer AI, import a difficult one-minute scene, and follow the Ultra upscaling workflow from this case study. The free trial lets you validate AI video upscaling on your own archival footage before rendering an entire film.

Free trial available · Windows 10/11 · macOS 12–26 · 100% local processing · No cloud uploads